Sport

How to Photograph Pickleball

My experience of photographing pickleball stems from a day at an indoor festival arranged by Sam Basford, one the leading lights of UK pickleball.  Alongside the six festival courts was a Franklin Premier Pickleball League tournament featuring some of the best players in the country, being played on a further four courts – so plenty of high-quality sport to photograph!

As usual, I had done as much research as I could beforehand, including watching some excellent videos on the rules of pickleball (and the scoring system) and looking at what other photographers had produced.  I couldn’t find much specifically on how to photograph the sport.

(Sony a9II; 70-200mm at 171mm; f/2.8; 1/1000th sec; ISO 1000)

I took two Sony a9IIs with me, along with two zoom lenses: a 24-70mm f2.8 and a 70-200mm f2.8.  I ended up using the longer lens almost all the time.  The light in the large hall was very variable, with light patches here and dark patches there, but the cameras coped well for most of the time. 

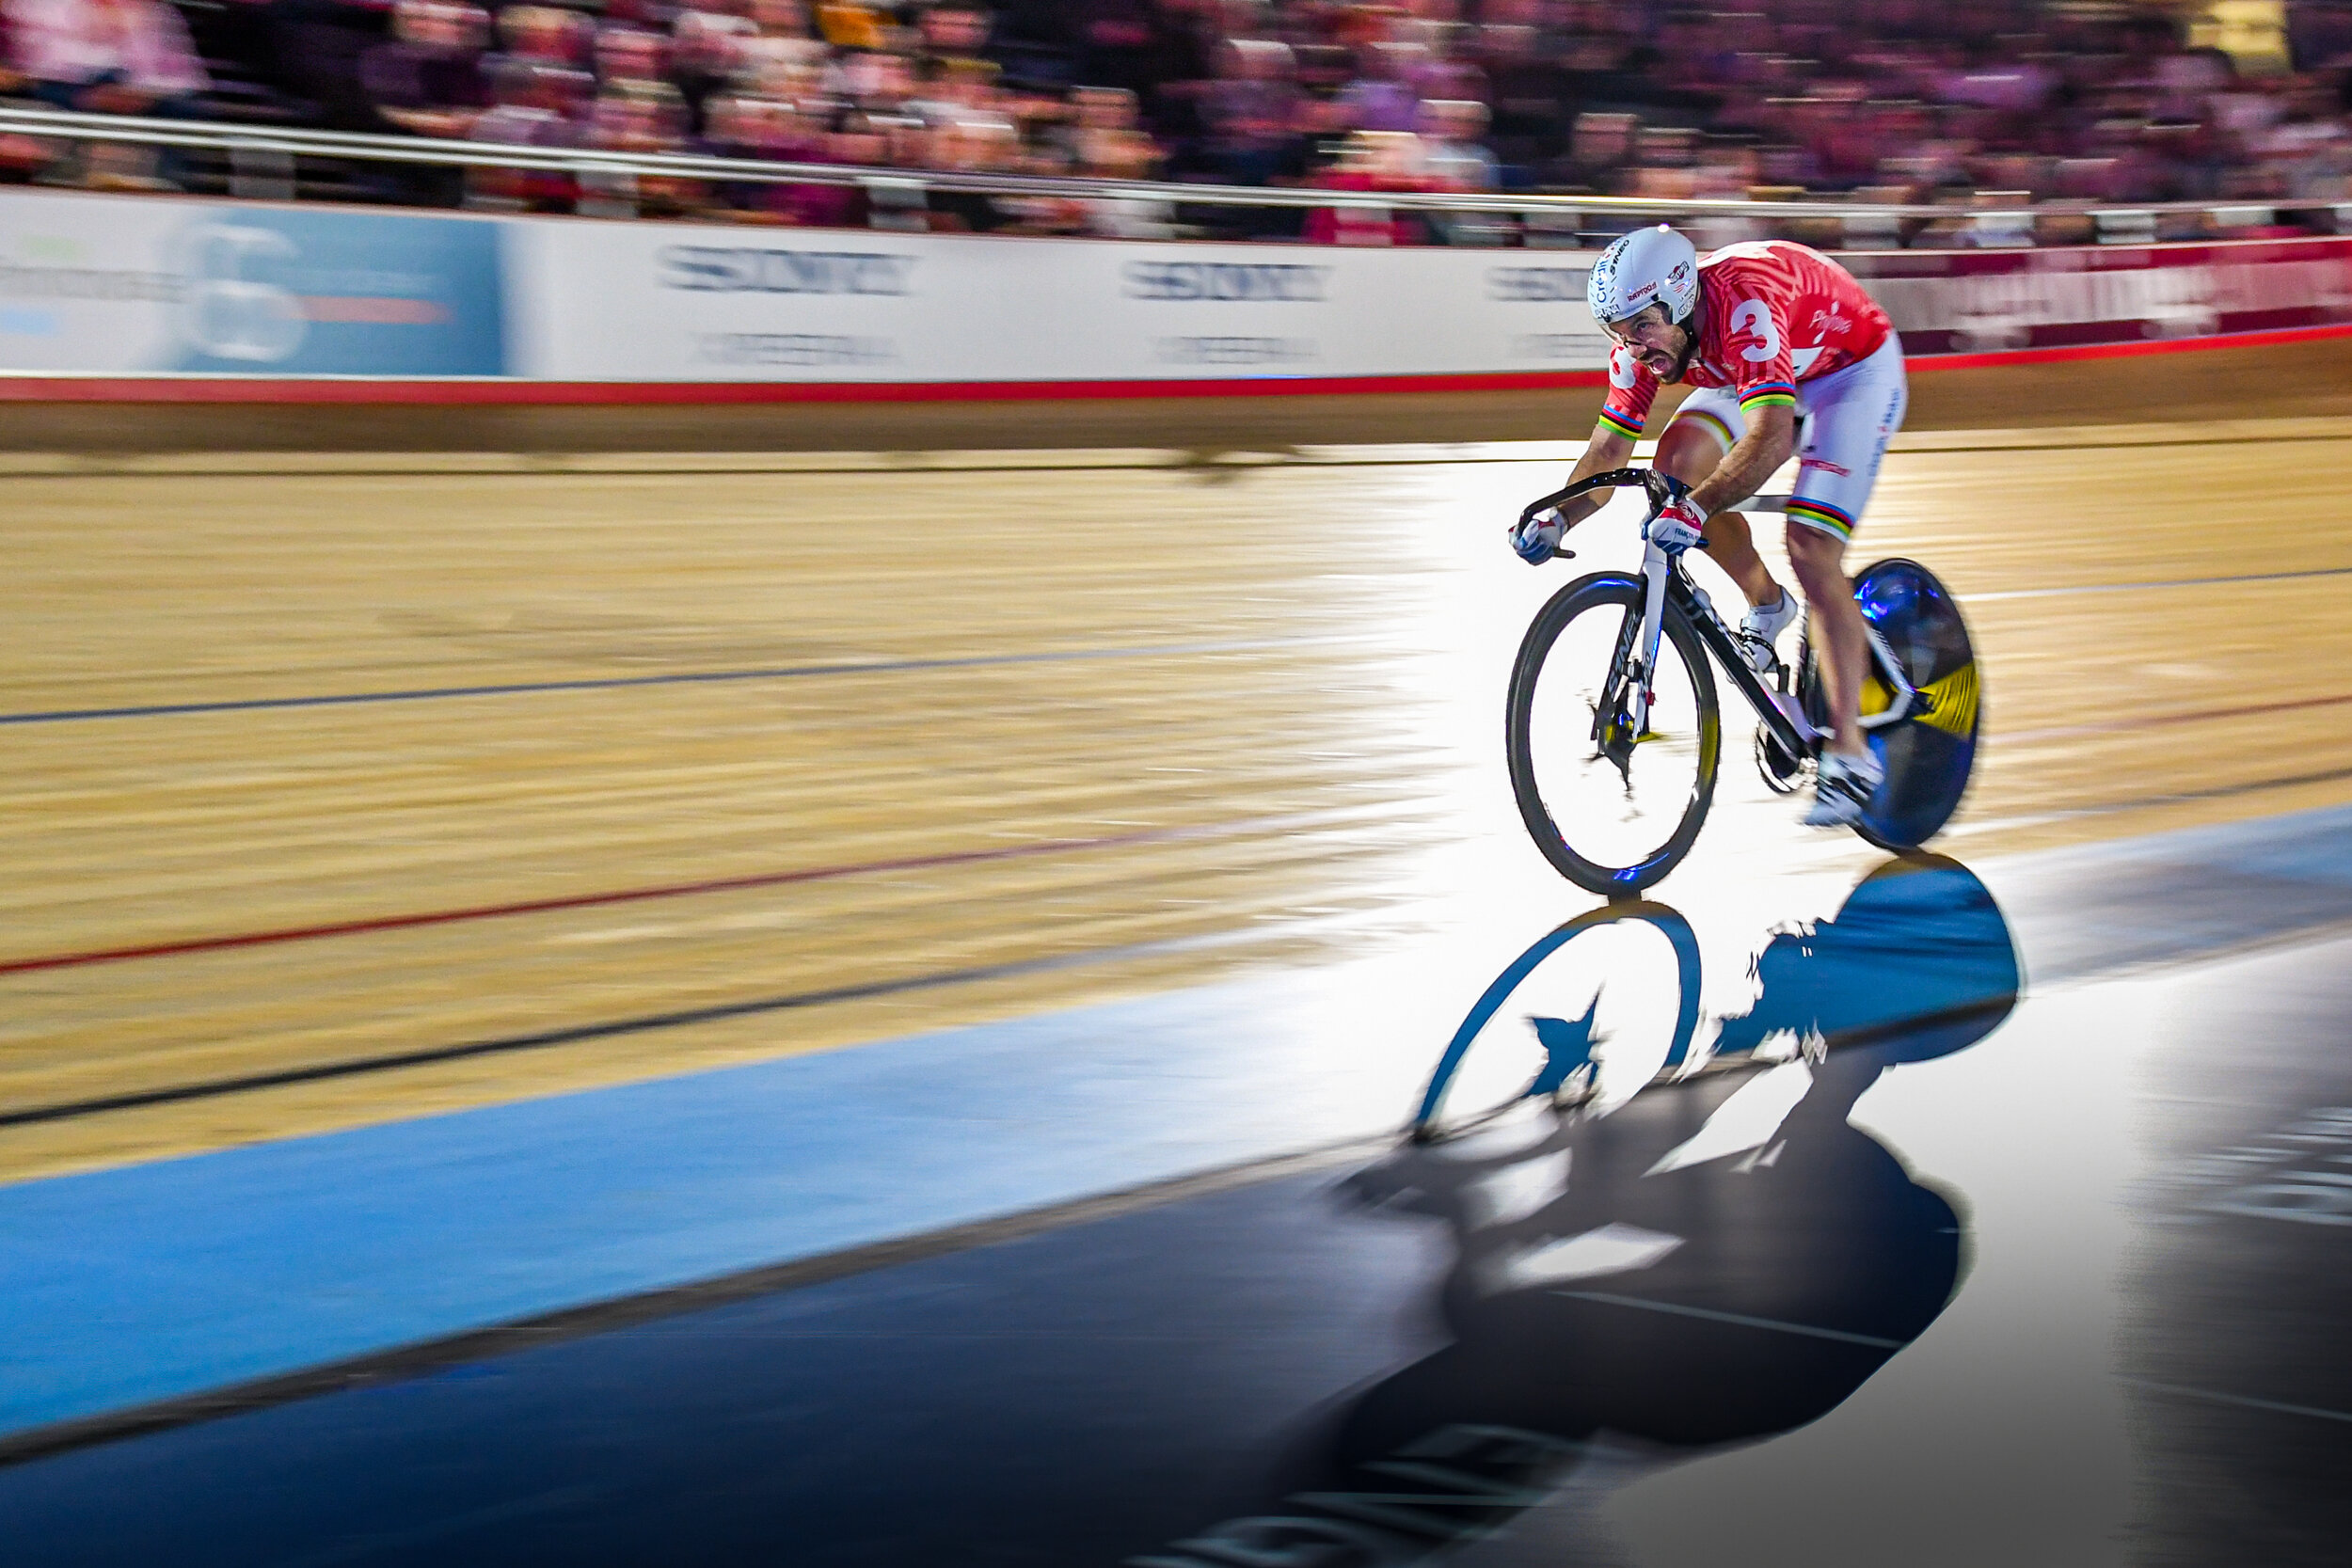
The exception was when some additional lights were switched on as it became darker during the afternoon which, although they made the hall lighter, had a very strange effect on the pictures, with strong banding (see image below).  I switched from electronic to mechanical shutter and put the Anti-Flicker feature on and this seemed to resolve the issue.

(Sony a9II; 70-200mm at 100mm; f/2.8; 1/1000th sec; ISO 6400)

I set out my ‘standard’ camera settings in my first blog,  'Getting into Sport and Music Photography' and also in my Sport Photography Top Tips.  In the case of pickleball, I generally kept the lens wide open to achieve a shallow depth of field and blur the background, as usual.  I used 1/1000th second to freeze the ball and had the ISO set on ‘Auto’, with an upper limit of 8000.

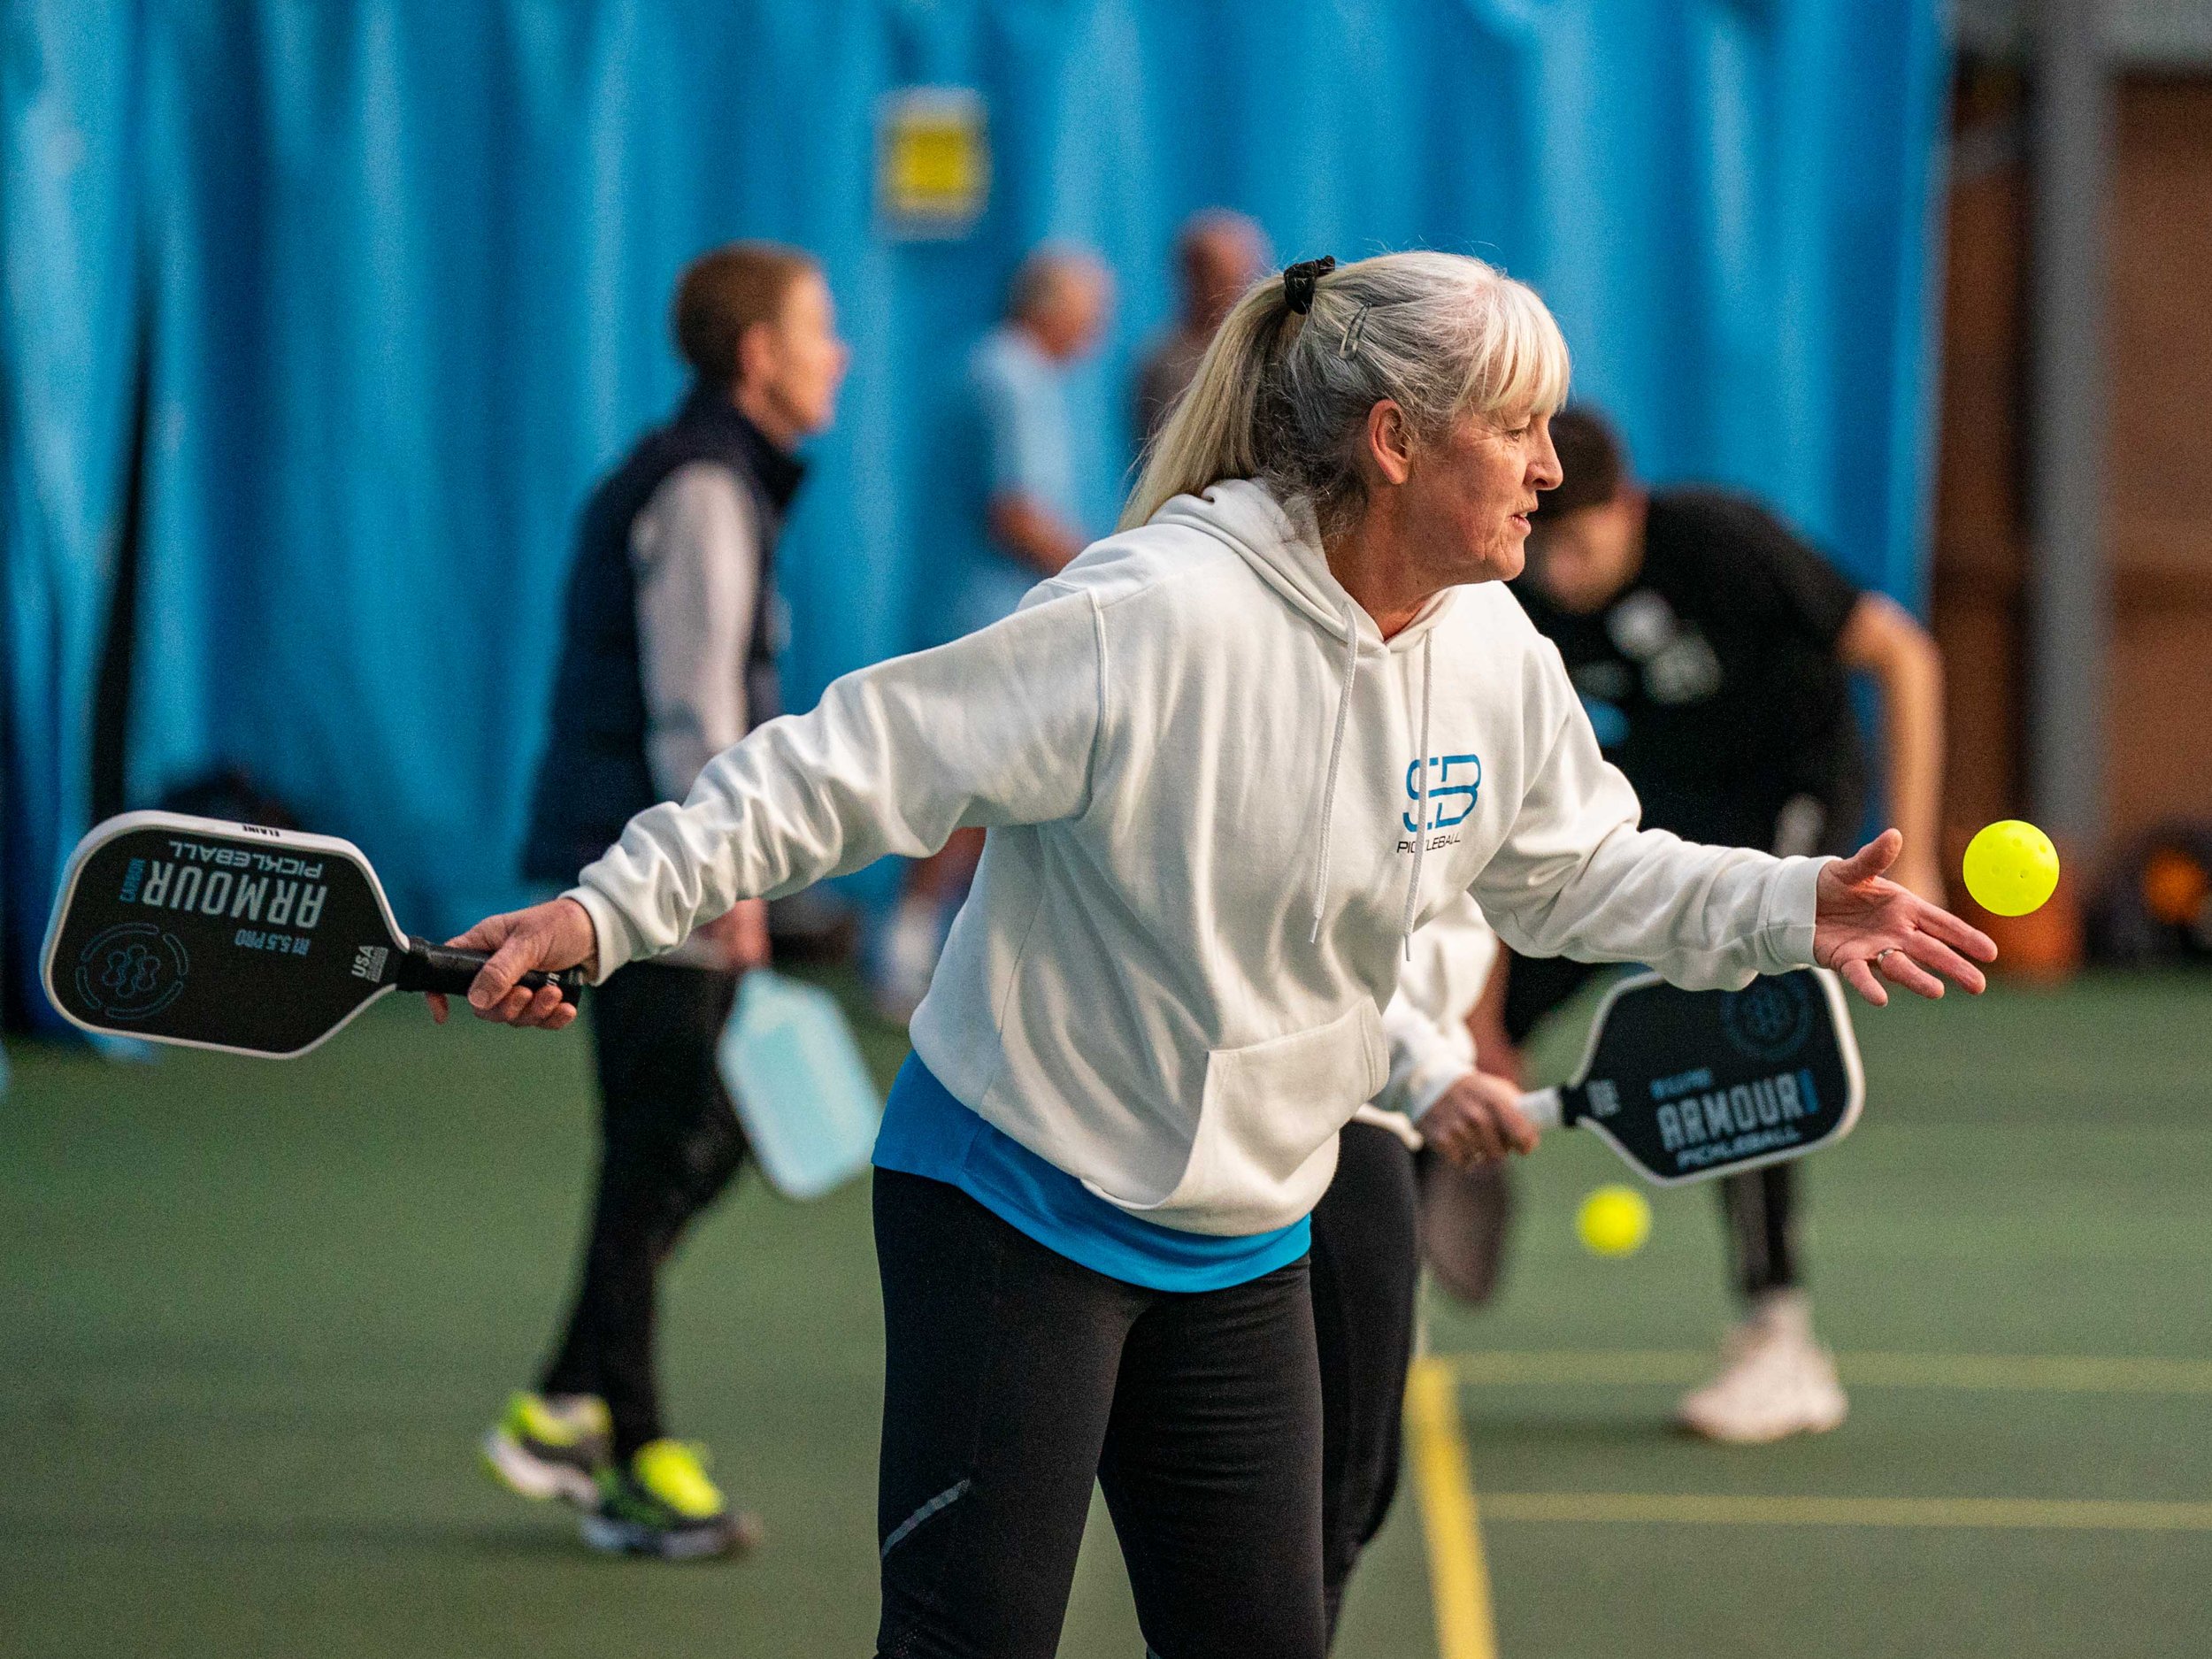
In many ways, photographing pickleball is very similar to tennis.  Whereas with ‘contact’ team sports, such as rugby, you get plenty of opportunities to capture opponents with each other, in pickleball it’s difficult to capture opponents – and even partners – together in the same photograph.  The image below tries to do just that.  I was quite close to the player, so lost the end of the paddle and her feet, but the wide shot does provide some context by showing the hall in which they were playing. 

(Sony a9II; 24-70mm at 24mm; f/3.5; 1/1000th sec; ISO 4000)

So, most of the time I found myself photographing individuals.  The first problem I encountered was the challenging backgrounds which, unless I managed to position myself so that the player was wholly in front of one of the blue curtains, were very distracting – see the photo below.

(Sony a9II; 70-200mm at 165mm; f/2.8; 1/1000th sec; ISO 5000)

Related to this issue was whether to stand or sit.  I normally advocate getting as low as possible because this makes the participants look larger and brings you into the action.  I did try this, but the problem was that I was then shooting slightly upwards and therefore exacerbating the distracting background issues by including the top of the blue curtain and the ironwork above (see below).

(Sony a9II; 70-200mm at 200mm; f/2.8; 1/1000th sec; ISO 2000)

As you would expect, I was shooting in ‘continuous high’ and, almost always, I selected the shot where the ball was closest to the player, because this created more drama.

(Sony a9II; 70-200mm at 140mm; f/2.8; 1/1000th sec; ISO 5000)

Pickleball can be extremely fast and there is always the problem that you miss the ideal shot because the ball has already left the frame – see below.  This is for the simple fact of reaction time: it takes a while for your eyes to tell your brain to tell your hands to take the shot.  So, unless you have ‘Pre-Capture’ technology in your camera, which enables you to ‘go back in time’ before you fully depressed the shutter release, you need to anticipate the action by starting to take your burst just before it happens.

(Sony a9II; 70-200mm at 200mm; f/2.8; 1/1000th sec; ISO 1600)

Bearing all these constraints in mind, my more successful images tended to be taken from behind the baseline towards the far end of the court, so that the net was in the frame.  This angle meant that I had the best chance of getting the player’s face straight on, so that they would be instantly recognisable.  Below is a standard, stock shot of a player.  As already mentioned, either just before or just after the player has hit the ball seems to work best.

(Sony a9II; 70-200mm at 200mm; f/2.8; 1/1000th sec; ISO 3200)

Recognising that I wouldn’t always be able to get a perfect background, I concentrated on getting a good separation between the main subject and the background, as in the photo below.  After all, the background provides context and shows the environment, counterbalancing any distractions.

(Sony a9II; 70-200mm at 200mm; f/2.8; 1/1000th sec; ISO 3200)

I also took photographs along the baseline, particularly of serves, thereby providing some variety.  In the photo below, the ball has just left the player’s hand, producing some movement to the image.

(Sony a9II; 70-200mm at 200mm; f/2.8; 1/1000th sec; ISO 4000)

This was also a good angle to capture the end-of-game tradition of ‘bumping paddles’, showing a more relaxed side of this highly social sport.  Note that the photo below was taken from low down, at net level, which gives it additional impact and intimacy.

(Sony a9II; 70-200mm at 70mm; f/2.8; 1/1000th sec; ISO 4000)

Wherever possible, I try to capture the essence of a sport, including its ‘idiosyncrasies’, so I made sure that I took photos of players leaning forward to avoid encroaching into the non-volley zone, which is something unique to pickleball. 

(Sony a9II; 70-200mm at 105mm; f/2.8; 1/1000th sec; ISO 8000)

On the basis that you should always capture reaction as well as action, I am always on the look out for those moments of happiness – or disappointment – that make sport so special to photograph …

(Sony a9II; 70-200mm at 173mm; f/2.8; 1/1000th sec; ISO 6400)

All in all, part of the fun of photographing pickleball is to capture the infectious enjoyment that everybody is having.  Why not give it a try?

With special thanks to Sam Basford Pickleball


If you have enjoyed this blog or if you have any questions/comments, please leave a message in the comments box below.

How to Photograph Rugby

How to Photograph Rugby

(All images copyright Michael Berkeley Photography - no reproduction without permission)

What better way of spending a cold, wet, miserable afternoon than photographing a game of rugby?!  There is nothing to beat battling the elements to capture the excitement and sheer physicality of the game.  I just love extreme pictures of players covered in mud … 

(Sony a9II; 70-200mm at 200mm; f/2.8; 1/1000th sec; ISO 3200)

My experience of photographing rugby comes from visits to my local club in Salisbury, Wiltshire.  At this level, the rugby is of a high quality, but it is sufficiently informal to allow a photographer to move around, a luxury that wouldn’t be afforded at a higher level.  

(Sony a9II; 70-200mm at 198mm; f/2.8; 1/800th sec; ISO 400)

This is important because the first decision to make when arriving at any sports event is where to position yourself.  My normal preference with sports that go ‘end-to-end’ (such as basketballfootball and ice hockey) is to be at the end towards which the team I am photographing is playing.  This means that the players you want to photograph are coming directly towards you – which in turn means that you will get good images of their faces – as above.

(Sony a9II; 70-200mm at 110mm; f/2.8; 1/800th sec; ISO 3200)

But all sports are different – and, although it does indeed go end-to-end, rugby is also played ‘side-to-side’ as the ball is passed across the pitch.  Excellent photos are therefore to be had from the side and, for this reason, I like the freedom to be able to roam up and down the touchline.  It also provides an opportunity to get closer to the action (as above) – but, of course, it also runs the big risk that you are not in the right place when a try is scored!

(Sony a9II; 70-200mm at 70mm; f/2.8; 1/800th sec; ISO 2500)

So, what kit and what settings do I use?  I am currently using a Sony a9II with either a 200-600mm f/5.6-6.3 or 70-200mm f/2.8 lens.  Previously I used Nikon cameras (D700 and D500), with similar lenses.  If it’s a sunny day, I might use the long lens on a monopod and use a backup camera (a Sony a7III) with the shorter lens, but it is sometimes difficult to swap between cameras when the action moves so quickly.  More often than not, therefore, I will just use the 70-200mm lens as that provides a good range to cover most eventualities.

(Nikon D700; 200-500mm at 500mm; f/5.6; 1/500th sec; ISO 500)

I set out the ‘standard’ camera settings in my blog Getting into Sport and Music Photography.  In summary, I normally set the camera to Manual and:

·       Open the lens wide open to make the depth of field as shallow as possible. 

·       Select a shutter speed at an appropriate level to freeze the action (around about 1/1000th sec). 

·       Set the ISO level to auto, within min/max parameters of 100 and about 3200.  

Other settings include:

·      Metering: probably centre-weighted.

·      Autofocus mode: AF-C with lock-on tracking.

·      Drive mode: continuous high.

·      File type: RAW in one slot and JPG in the other.

·      White balance: auto – and I’ll sort any problems in post processing.

Of course, these settings change depending on the circumstances, but this is the start point.

(Nikon D700; 200-500mm at 460mm; f/5.6; 1/1000th sec; ISO 800)

Rugby differs from many other sports because there are set pieces – scrums and lineouts – that break up the play.  Both provide opportunities for good shots, but they also have their challenges.  In the case of both, you know where the players are going to be, although most of the players are tied into a scrum and are not therefore visible.  In the photo above, the back row is getting ready to break – the ball is visible at the feet of the players on the left – but there isn’t much action.

(Sony a9II; 70-200mm at 200mm; f/2.8; 1/1000th sec; ISO 200)

With a lineout, you don’t know exactly where the ball is going to be thrown, and the height to which the jumper is lifted makes it difficult to get a close shot in landscape mode.  In the photo above, the players are quite distant, so the drama is reduced.  One solution is to go for a portrait orientation, as below.

(Sony a9II; 70-200mm at 70mm; f/2.8; 1/1000th sec; ISO 800)

In the case of both scrums and lineouts, with the forwards largely tied up with the set piece, it may be possible to get a good picture of the scrum half distributing the ball, as below.  The problem often is that there are people in the way – this is the same issue that makes basketball photography such a challenge.  There are simply too many people in too small a space – and most of them have their back to you!

(Nikon D500; 200-500mm at 440mm; f/5.6; 1/1000th sec; ISO 280)

When the ball is with the three-quarters in space, however, there should be opportunities to capture dramatic moments as they try to evade their opponents.

(Nikon D700; 200-500mm at 460mm; f/5.6; 1/1600th sec; ISO 640)

Making – or missing – tackles can also make good images.  There are almost always good facial expressions to capture and these tell a story, as well as portraying emotion – see below.

(Nikon D700; 200-500mm at 500mm; f/5.6; 1/500th sec; ISO 560)

The essence of all sport photography is to tell the story of the game, and this is often the hardest part of the challenge. The club or the media is going to want a picture of the tries being scored.  This is often a matter of being in the right place at the right time, which can be down to luck.  In the photo below, the fly half is stretching to touch the ball down, despite the best efforts of the opposition.  This the shot that a local paper would want, although I would have preferred to have got more of the scorer’s face in the picture and maybe the white line more visible too.

(Nikon D700; 200-500mm at 210mm; f/5.6; 1/640th sec; ISO 800)

Part of telling the story is to convey the weather conditions – especially if it is a foul day.  Unfortunately, modern cameras are so good that they often make the conditions look better than they really are!  The image below was taken in torrential rain, and the picture doesn’t really convey quite how bad it was.  Whereas backgrounds can often be distracting, the umbrellas in the distance help to tell the story – and the supporter in the red coat raising his arms in triumph add to the message that the player with the ball is about to score. 

(Nikon D500; 70-200mm at 150mm; f/2.8; 1/800th sec; ISO 280)

While on the subject of rain, I usually use a rain cover on the camera when it is throwing it down.  Although they say that the camera has a degree of weather-sealing, I prefer not to take the risk – and I certainly wouldn’t change lenses in the rain.

I am as guilty as anyone of ‘chimping’ – reviewing images as soon as I have taken them – but it’s really important to resist the temptation.  You never know when something is going to happen in the margins of the main action, and this is often when the most memorable images are to be had.  You should always be on the lookout for the photograph that nobody else has seen.  A lot of this is luck (‘right place at the right time’ again!), but it is possible to make your own luck by understanding the game and anticipating what is going to happen next.  Although I am not sure anybody could have predicted what happened in the photo below …

(Sony a9II; 70-200mm at 158mm; f/2.8; 1/1600th sec; ISO 320)

Capturing the referee being upended in the photo below was a stroke of luck, as I just happened to be photographing the action when the unexpected happened.  It’s the old adage “If you see it, you have already missed it” – because it takes time for the eyes to tell the brain to tell the fingers to press the shutter release …

(Nikon D500; 70-200mm at 200mm; f/2.8; 1/800th sec; ISO 360)

Rugby is fun to watch and fun to photograph.  While you might prefer to wait until a sunny day, that is not entering into the spirit of the game!  Why not give it a go?!

(Sony a9II; 70-200mm at 198mm; f/2.8; 1/1000th sec; ISO 3200)

With special thanks to Salisbury Rugby Club.


If you have enjoyed this blog or if you have any questions/comments, please leave a message in the comments box below.

How to Photograph Track Cycling

(All images copyright Michael Berkeley Photography - no reproduction without permission)

Photographing track cycling was a very different challenge for me because I am primarily used to photographing sport outdoors - cricket, football, polo etc - or, if indoors, with consistent light, such as basketball and ice hockey. This was altogether different - and very exciting!

Picture 1.jpg

My experience of track cycling comes from 2 visits to Lee Valley VeloPark on Queen Elizabeth Olympic Park in London in 2017 and 2018.  I had been given a photo pass for the Six Day London event and this gave me access to the photographers’ positions at the end of the finishing straight and also trackside access.

The Six Day Series website promises high octane action: 

“The lights get turned down and the music turned up, as Six Day Cycling combines the very best in track cycling with an incredible party atmosphere. Expect the action to come thick and fast as our track centre DJ keeps the party going before, during and after the racing.”

(Nikon D500; 200-500mm at 200mm; f/5.6; 1/320th sec; ISO 12,800)

(Nikon D500; 200-500mm at 200mm; f/5.6; 1/320th sec; ISO 12,800)

There is plenty of variety too, with events including the Madison (cycling in pairs); the Elimination (last one out); the Derny (each cyclist follows a moped); the 200m time trial (head to head); and the Keirin (all behind a single moped).

There is a great atmosphere and the audience is whipped up to a fever pitch of excitement. The party atmosphere is partly generated by the dramatic lighting, which of course makes it all the more interesting for the photographer.

(Nikon D500; 18-55mm at 55mm; f/5.6; 1/60th sec; ISO 2800)

(Nikon D500; 18-55mm at 55mm; f/5.6; 1/60th sec; ISO 2800)

I set out my ‘standard’ settings in my blog Getting into Sport and Music Photography.  A high proportion of my sport images use a wide-open aperture to give a shallow depth of field, in order to separate the action and point(s) of interest from the foreground and background.  While I did of course do this at the cycling, I found panning a more fruitful technique (see my blog on How to Photograph Speedway for more information on panning).

(Nikon D500; 70-210mm at 70mm; f/4; 1/80th sec; ISO 1800)

(Nikon D500; 70-210mm at 70mm; f/4; 1/80th sec; ISO 1800)

I used a Nikon D500 on both visits and I had a Nikon 200-500mm f/5.6 lens at both too.  In 2017, however, I had an 18-55mm f/3.5-5.6 lens and a 70-210mm f/4-5.6 lens.  In the challenging conditions, these struggled to get enough light into the camera. When I returned a year later, I was better equipped with a 24-70mm f/2.8 and a 70-200mm f/2.8.

One benefit of an event like this is that there is plenty of opportunity to try different positions, angles, settings etc.  The races last for some while and there are therefore a large number of laps.  Although the basic premise is the same – riding around the track in the same direction in every race – the different disciplines bring different characteristics to capture.

(Nikon D500; 70-210mm at 70mm; f/5; 1/320th sec; ISO 11,400)

(Nikon D500; 70-210mm at 70mm; f/5; 1/320th sec; ISO 11,400)

In the Madison, for example, riders competing in pairs use a ‘hand-sling’ to catapult their partner forwards when they are handing over the turn to race – see photo above. 

This is very different in character from the Derny, where the competitors ride in the slipstream of a motorised pacer (incidentally, the 6 Day Series website describes the expressions of the derny pacers as ranging from ‘inscrutable’ to ‘very inscrutable’).  In the image below, the emphasis is on the derny riders, rather than the cyclists, in order to convey the character of this race.

(Nikon D500; 200-500mm at 200mm; f/5.6; 1/320th sec; ISO 8000)

(Nikon D500; 200-500mm at 200mm; f/5.6; 1/320th sec; ISO 8000)

And in the Sprint …  Racing is highly tactical, with the 2 riders vying for position, occasionally leading to both of them executing track stands – i.e. not moving – in order to make the other go first (see below).  This is trying to ‘tell the story’ of how the 2 cyclists are highly competitive and trying to get one over the other – by doing nothing.

(Nikon D500; 70-200mm at 150mm; f/2.8; 1/80th sec; ISO 1600)

(Nikon D500; 70-200mm at 150mm; f/2.8; 1/80th sec; ISO 1600)

As I mentioned at the start, the majority of my sport photography tends to be outdoors and during daylight and, where I have photographed sport indoors, the lighting has been constant.  It was very exciting therefore to photograph an event where the light show was all part of the atmosphere.  The races themselves were conducted with the stadium lights dimmed and the track itself lit, providing great opportunities to play with shadows.

(Nikon D500; 70-200mm at 98mm; f/2.8; 1/400th sec; ISO 800)

(Nikon D500; 70-200mm at 98mm; f/2.8; 1/400th sec; ISO 800)

At the end of each race, spotlights followed the victorious rider around the track on their celebratory lap – see below.  

(Nikon D500; 200-500mm at 200mm; f/5.6; 1/320th sec; ISO 7200)

(Nikon D500; 200-500mm at 200mm; f/5.6; 1/320th sec; ISO 7200)

While the photographers’ positions at the end of the finishing straight gave a perfect view down the track, the images were taken from higher up, which meant that it was more difficult to see the riders’ face, even when they were at the far end of the track.  

By getting down to track level, it was possible to get much closer to the action and, by crouching down, almost to look up at the riders as they went past.

(Nikon D500; 24-70mm at 24mm; f/2.8; 1/100th sec; ISO 1100)

(Nikon D500; 24-70mm at 24mm; f/2.8; 1/100th sec; ISO 1100)

The photograph above was taken with a wide-angle lens, and the rider was only feet away and travelling at speed.  The shutter speed of 1/100th second was enough to provide motion blur, whereas a faster shutter speed would have made it feel more static.  Moreover, taking the image directly into the bright light – on the third – draws the eye to the rider’s face and bicycle … The photo below was taken with the same lens but zoomed in. Again the shadow comes into play.

(Nikon D500; 24-70mm at 70mm; f/2.8; 1/100th sec; ISO 1400)

(Nikon D500; 24-70mm at 70mm; f/2.8; 1/100th sec; ISO 1400)

It is always tempting to lose concentration when the main action is over, but this is often when there are interesting photos to be had.  It is always worth keeping alert – and resist the temptation to review the photographs that you have already taken!

The image below shows the celebratory victory lap and the connection between the rider and the audience.  It brings together interesting lighting, the curves of the track side, and the rider’s colourful clothing to produce an atmospheric shot. 

(Nikon D500; 200-500mm at 240mm; f/5.6; 1/320th sec; ISO 5000)

(Nikon D500; 200-500mm at 240mm; f/5.6; 1/320th sec; ISO 5000)

Both my visits to Lee Valley VeloPark were hugely enjoyable and the photography was extremely rewarding.  As I am not used to photographing in such conditions, the main challenges were to exploit the dramatic lighting to best effect and also to convey the variety of cycling spectacle that is the Six Day Series.

With particular thanks to Six Day London.


If you have enjoyed this blog or if you have any questions/comments, please leave a message in the comments box below.