How to Photograph Eventing
(Dressage, Show Jumping & Cross Country)
(All images copyright Michael Berkeley Photography - no reproduction without permission)
I was brought up in Cirencester, Gloucestershire, and most years we would go to the Badminton Horse Trials nearby to enjoy the Cross Country day. This was a long time before I started taking sport photography more seriously, but my two recent visits to the Wilton Horse Trials near Salisbury, Wiltshire (where I now live) brought back some very happy memories.
The benefit of Eventing is that you get three sports for the price of one, and all in one day!
(Nikon D500; 70-200mm at 200mm; f/2.8; 1/1250th sec; ISO 400)
As always, I used the camera settings that I explained in my blog Getting into Sport and Music Photography, the general principle being to blur backgrounds with a wide open aperture; a fast shutter speed to compensate and freeze the action; and an Auto ISO setting within parameters. It’s always important to ensure that the rider is recognisable, so that meant taking the photographs from in front.
I use Continuous Shooting High, so that I have a better chance of capturing the decisive moment; and use a focus tracking mode (3D Tracking on Nikon) so that the main subject stays in focus while moving across the viewfinder.
Both days were bright and this led to some very fast shutter speeds. Looking at the camera settings in hindsight, some shutter speeds were unnecessarily high - if I had reduced them, the ISO setting would have reduced also, which would have been beneficial.
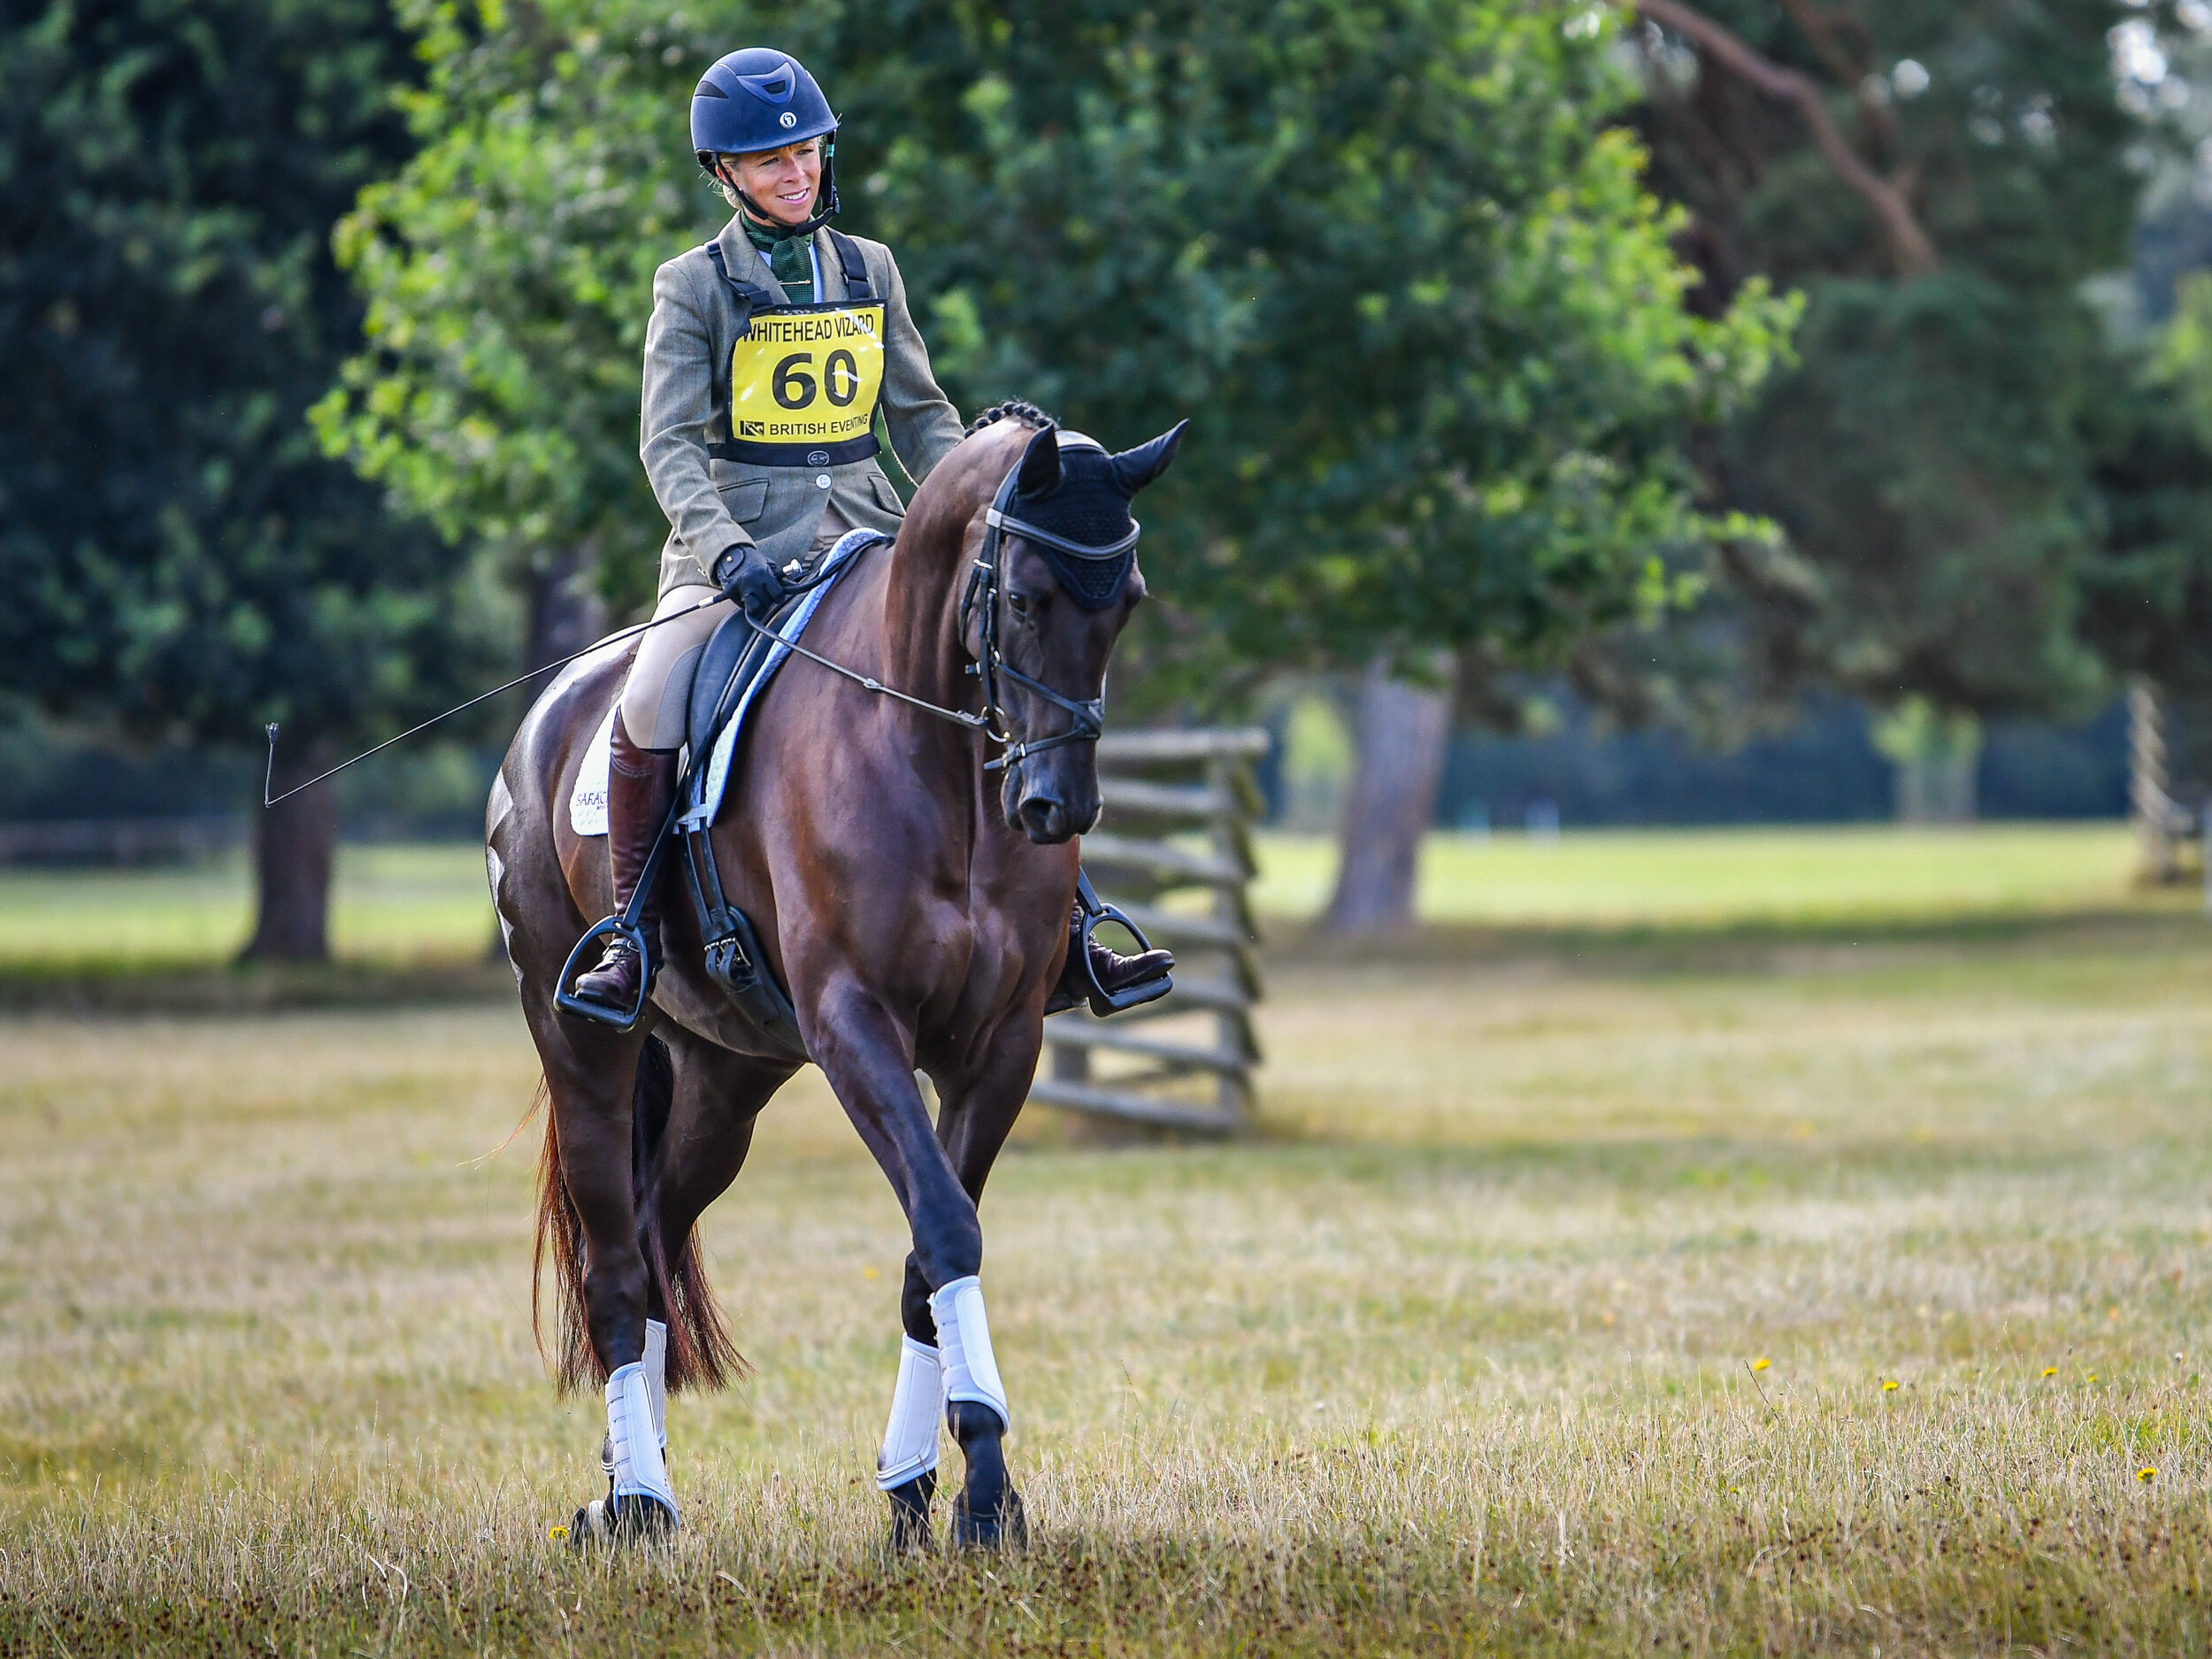
Dressage
I arrived early in order to capture the dressage stage, which was first on.
While I thought I knew something about the show jumping and the cross country elements, I confess that I knew – and still know – absolutely nothing about dressage. And I suspect I never will, because it seems to be a mystery to anybody outside the sport.

(Nikon D500; 70-200mm at 102mm; f/2.8; 1/1250th sec; ISO 250)
This is very significant, because it is difficult to photograph a sport about which you know very little. My aim is always to show the participant in as good a light as possible, and the arcane subtleties of dressage mean that there is every likelihood that you will inadvertently take a photograph of a technical flaw in the performance that the rider would prefer you not to publish.
Against this background, I tried to take images that showed the dressage in the wider environment of elegant Wilton House and its grounds. The image above, with the Palladian Bridge behind, shows the concentration on the rider’s face and the head on view minimises the risk on showing the horse’s legs in a less than perfect position.

(Nikon D500; 70-200mm at 110mm; f/2.8; 1/1250th sec; ISO 200)
The picture above shows the rider with Wilton House in the background. In both these photos, the shallow depth of field blurs the background slightly and makes the rider stand out from it.
If you would like to know more about the technicalities of dressage and how to photograph it successfully, I would recommend an article written by Alice Collins for Horse and Hound in March 2017 entitled Photographing dressage horses: how to show your horse off to the max.
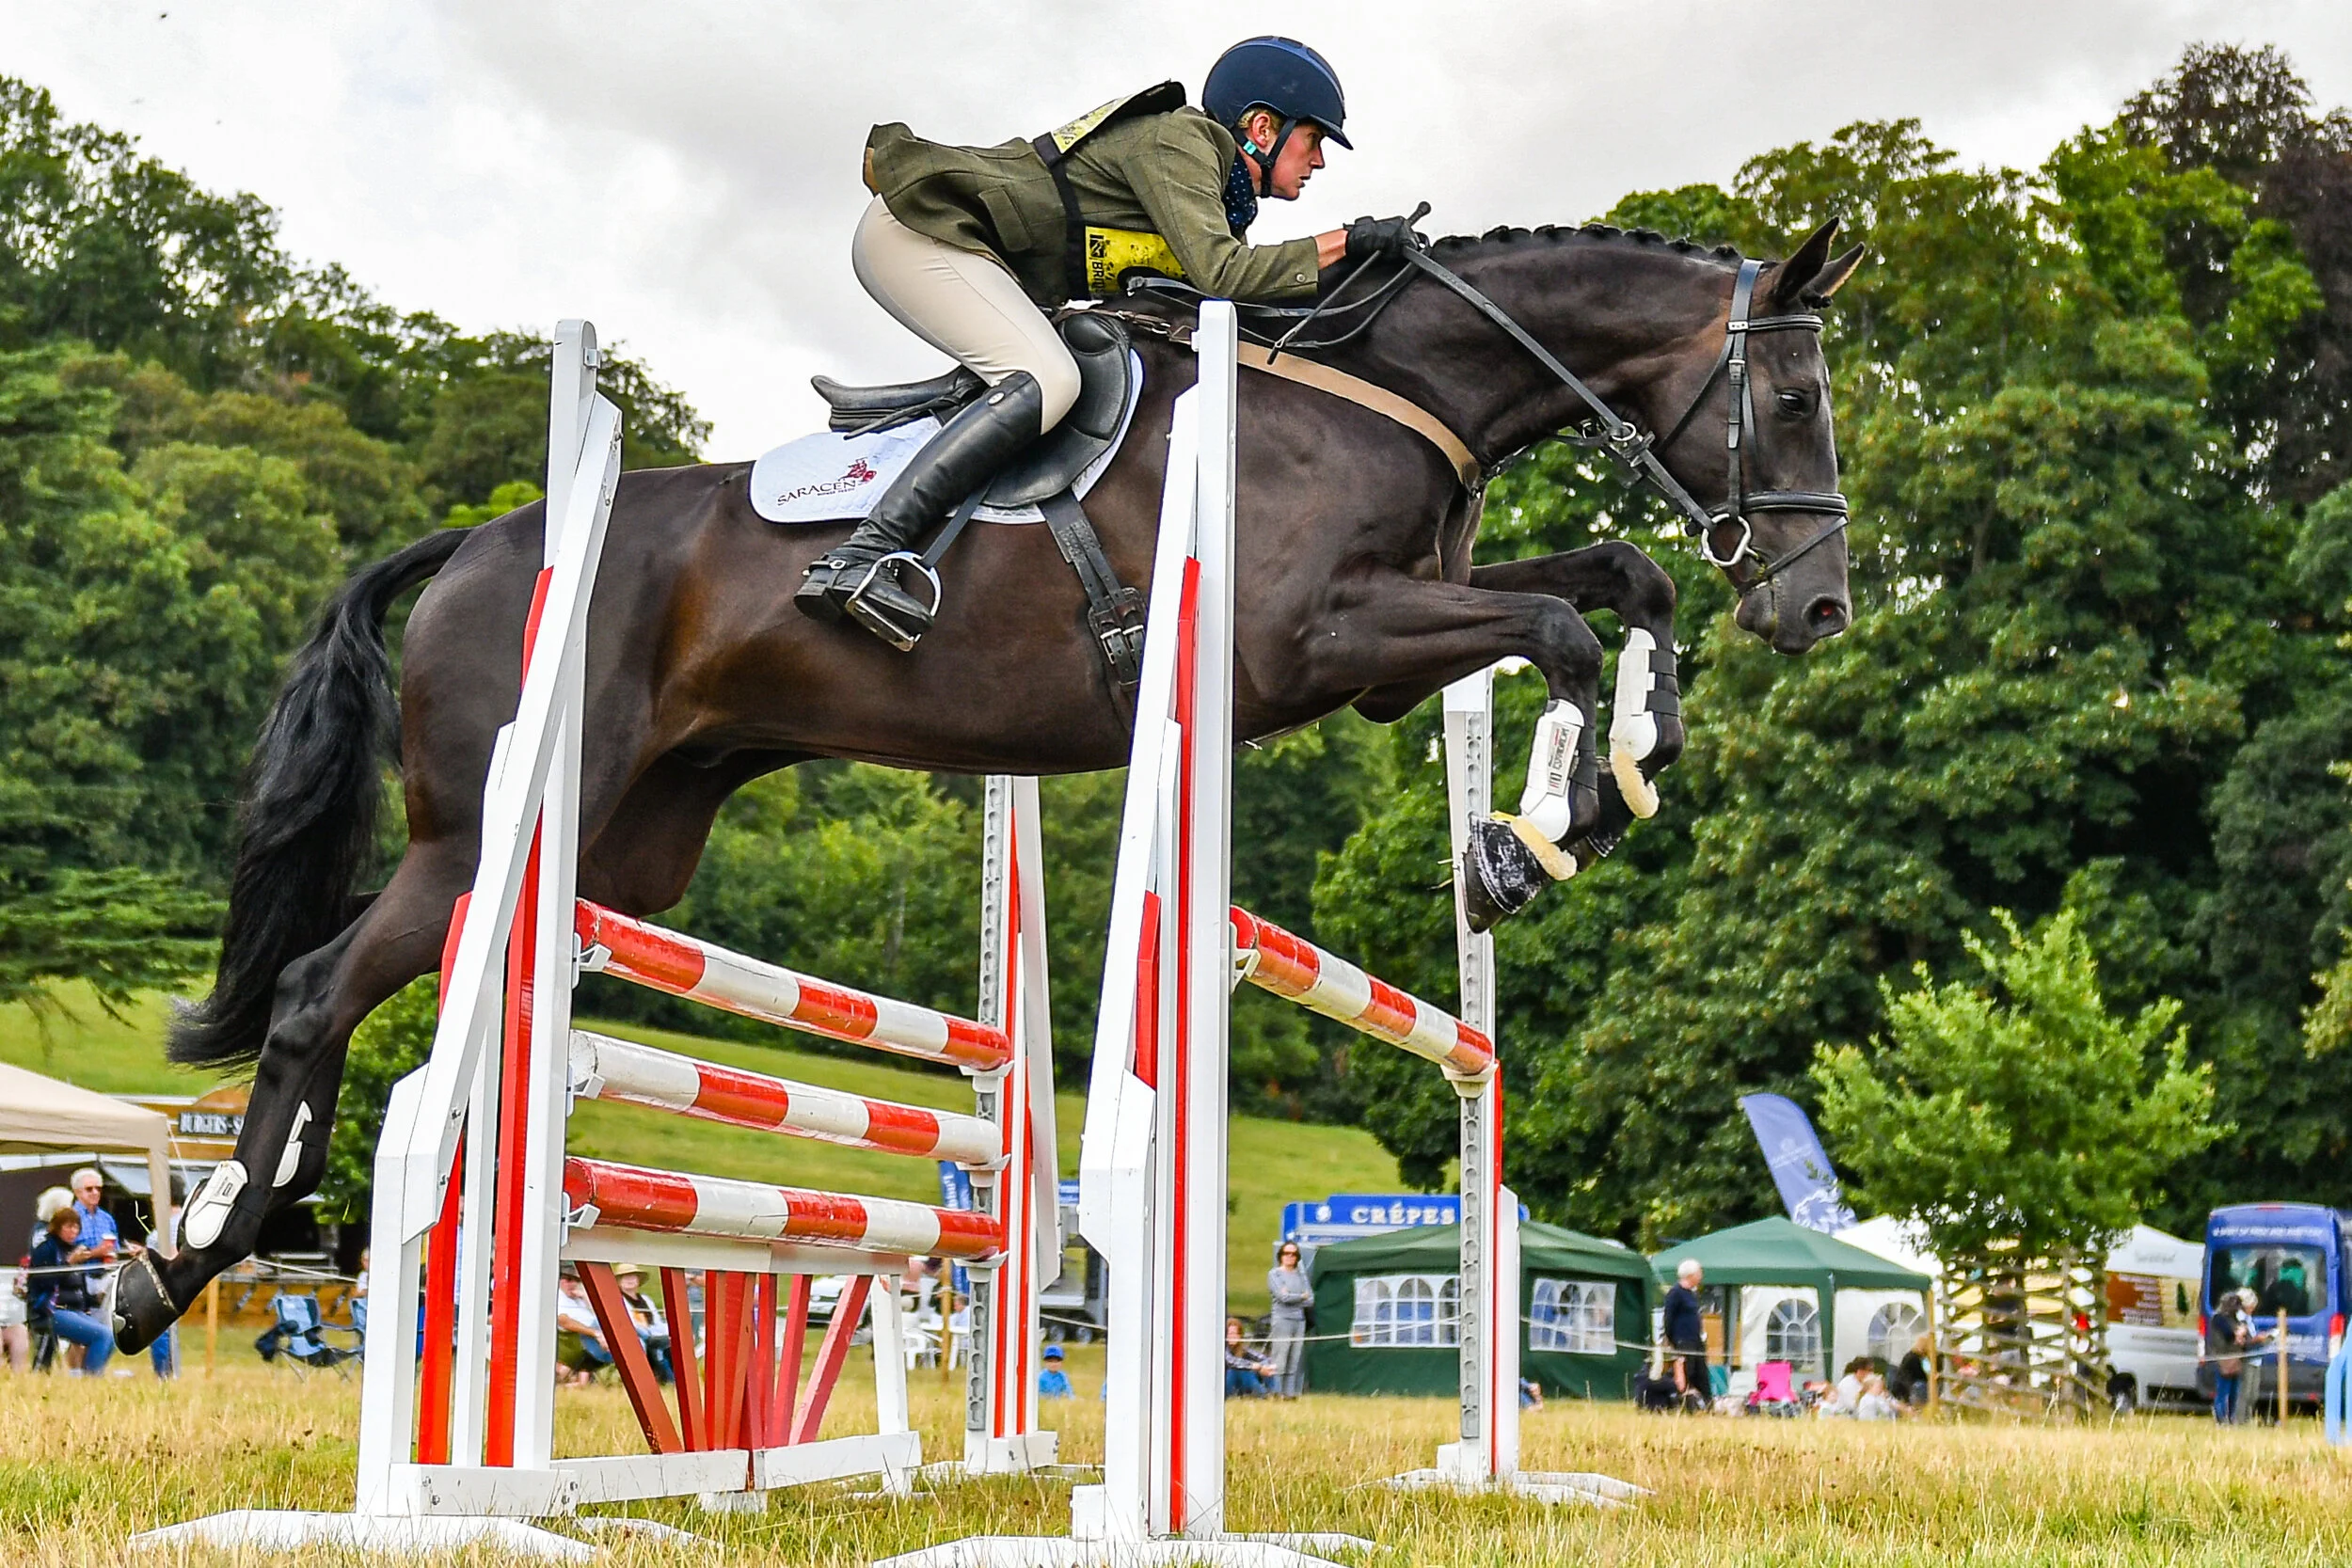
Show Jumping
Next stop: show jumping. Some of the jumps were by the edge of the arena, which meant that I could get extremely close to them. Others were in the centre, so I used a combination of a longer lens (70-200mm f/2.8) for the jumps that were further away and a wide-angle lens (24-70 f/2.8) for those close by.
(Nikon D500; 24-70mm at 32mm; f/2.8; 1/2000th sec; ISO 160)
I tried to get as low to the ground as possible in order to add drama to the images and also to make the horse and rider appear more ‘heroic’ through that perspective. The shot above includes the whole of the fence and this usefully provides a good impression of how high it is.
This approach does, however, introduce quite a lot of the background – tents, stalls etc. This could either be considered good environmental context or, less charitably, to distract from the main action. To get over this, the photo below is framed much more closely on the rider and horse, still from a low perspective. While providing a good shot of the rider and horse, there is now nothing to show that it was taken at Wilton Horse Trial, so it has lost its context.

(Nikon D500; 70-200mm at 70mm; f/2.8; 1/2000th sec; ISO 280)
You will see that the rider is already thinking of the next jump and is looking in that direction. The image might have been stronger if the next fence had been to her left rather than to her right, as she would then have been looking more directly towards me.
The photo below is taken ‘front on’, so you get a good view of both the rider and the horse. As in all the images I have shown, the horse is fully off the ground and the front legs are tucked up as they launch themselves across the fence.

(Nikon D500; 70-200mm at 150mm; f/2.8; 1/8000th sec; ISO 900)
Cross Country
Walking the cross country course is hugely enjoyable and gives a chance to photograph riders negotiating each of the jumps. This provides more variety than the show jumping and plenty of opportunities to try something new. As the course at Wilton was not taped off all around the course, it was essential to pay attention to the stewards’ whistle to avoid getting in the way when the riders and horses come through. Health and safety come first!

(Nikon D500; 70-200mm at 140mm; f/2.8; 1/2000th sec; ISO 720)
Each jump has its own challenge for the rider and for the photographer alike. The fence above was in a small copse, which meant that the rider and horse were in deep shadow. Setting the exposure for them led the background to be burnt out (much too bright) but it was more important that the main subject was correctly exposed.
This photo tries to provide the context of the fence, as does the image below. In this one, the main focus is on the jump itself, with the horse and rider becoming incidental, albeit standing out against the blue sky. Taking this from a low perspective provides some idea of how steep the drop in height was from top to bottom.

(Nikon D500; 70-200mm at 102mm; f/2.8; 1/2000th sec; ISO 100)
The disadvantage of having the rider in the distance is that you cannot see their face so well. In the image below, however, where the rider is clinging on for her life, the expression is everything. Moreover, it introduces an element of emotion and tension – it ‘tells a story’. Will she or won’t she fall off? (She didn’t!)
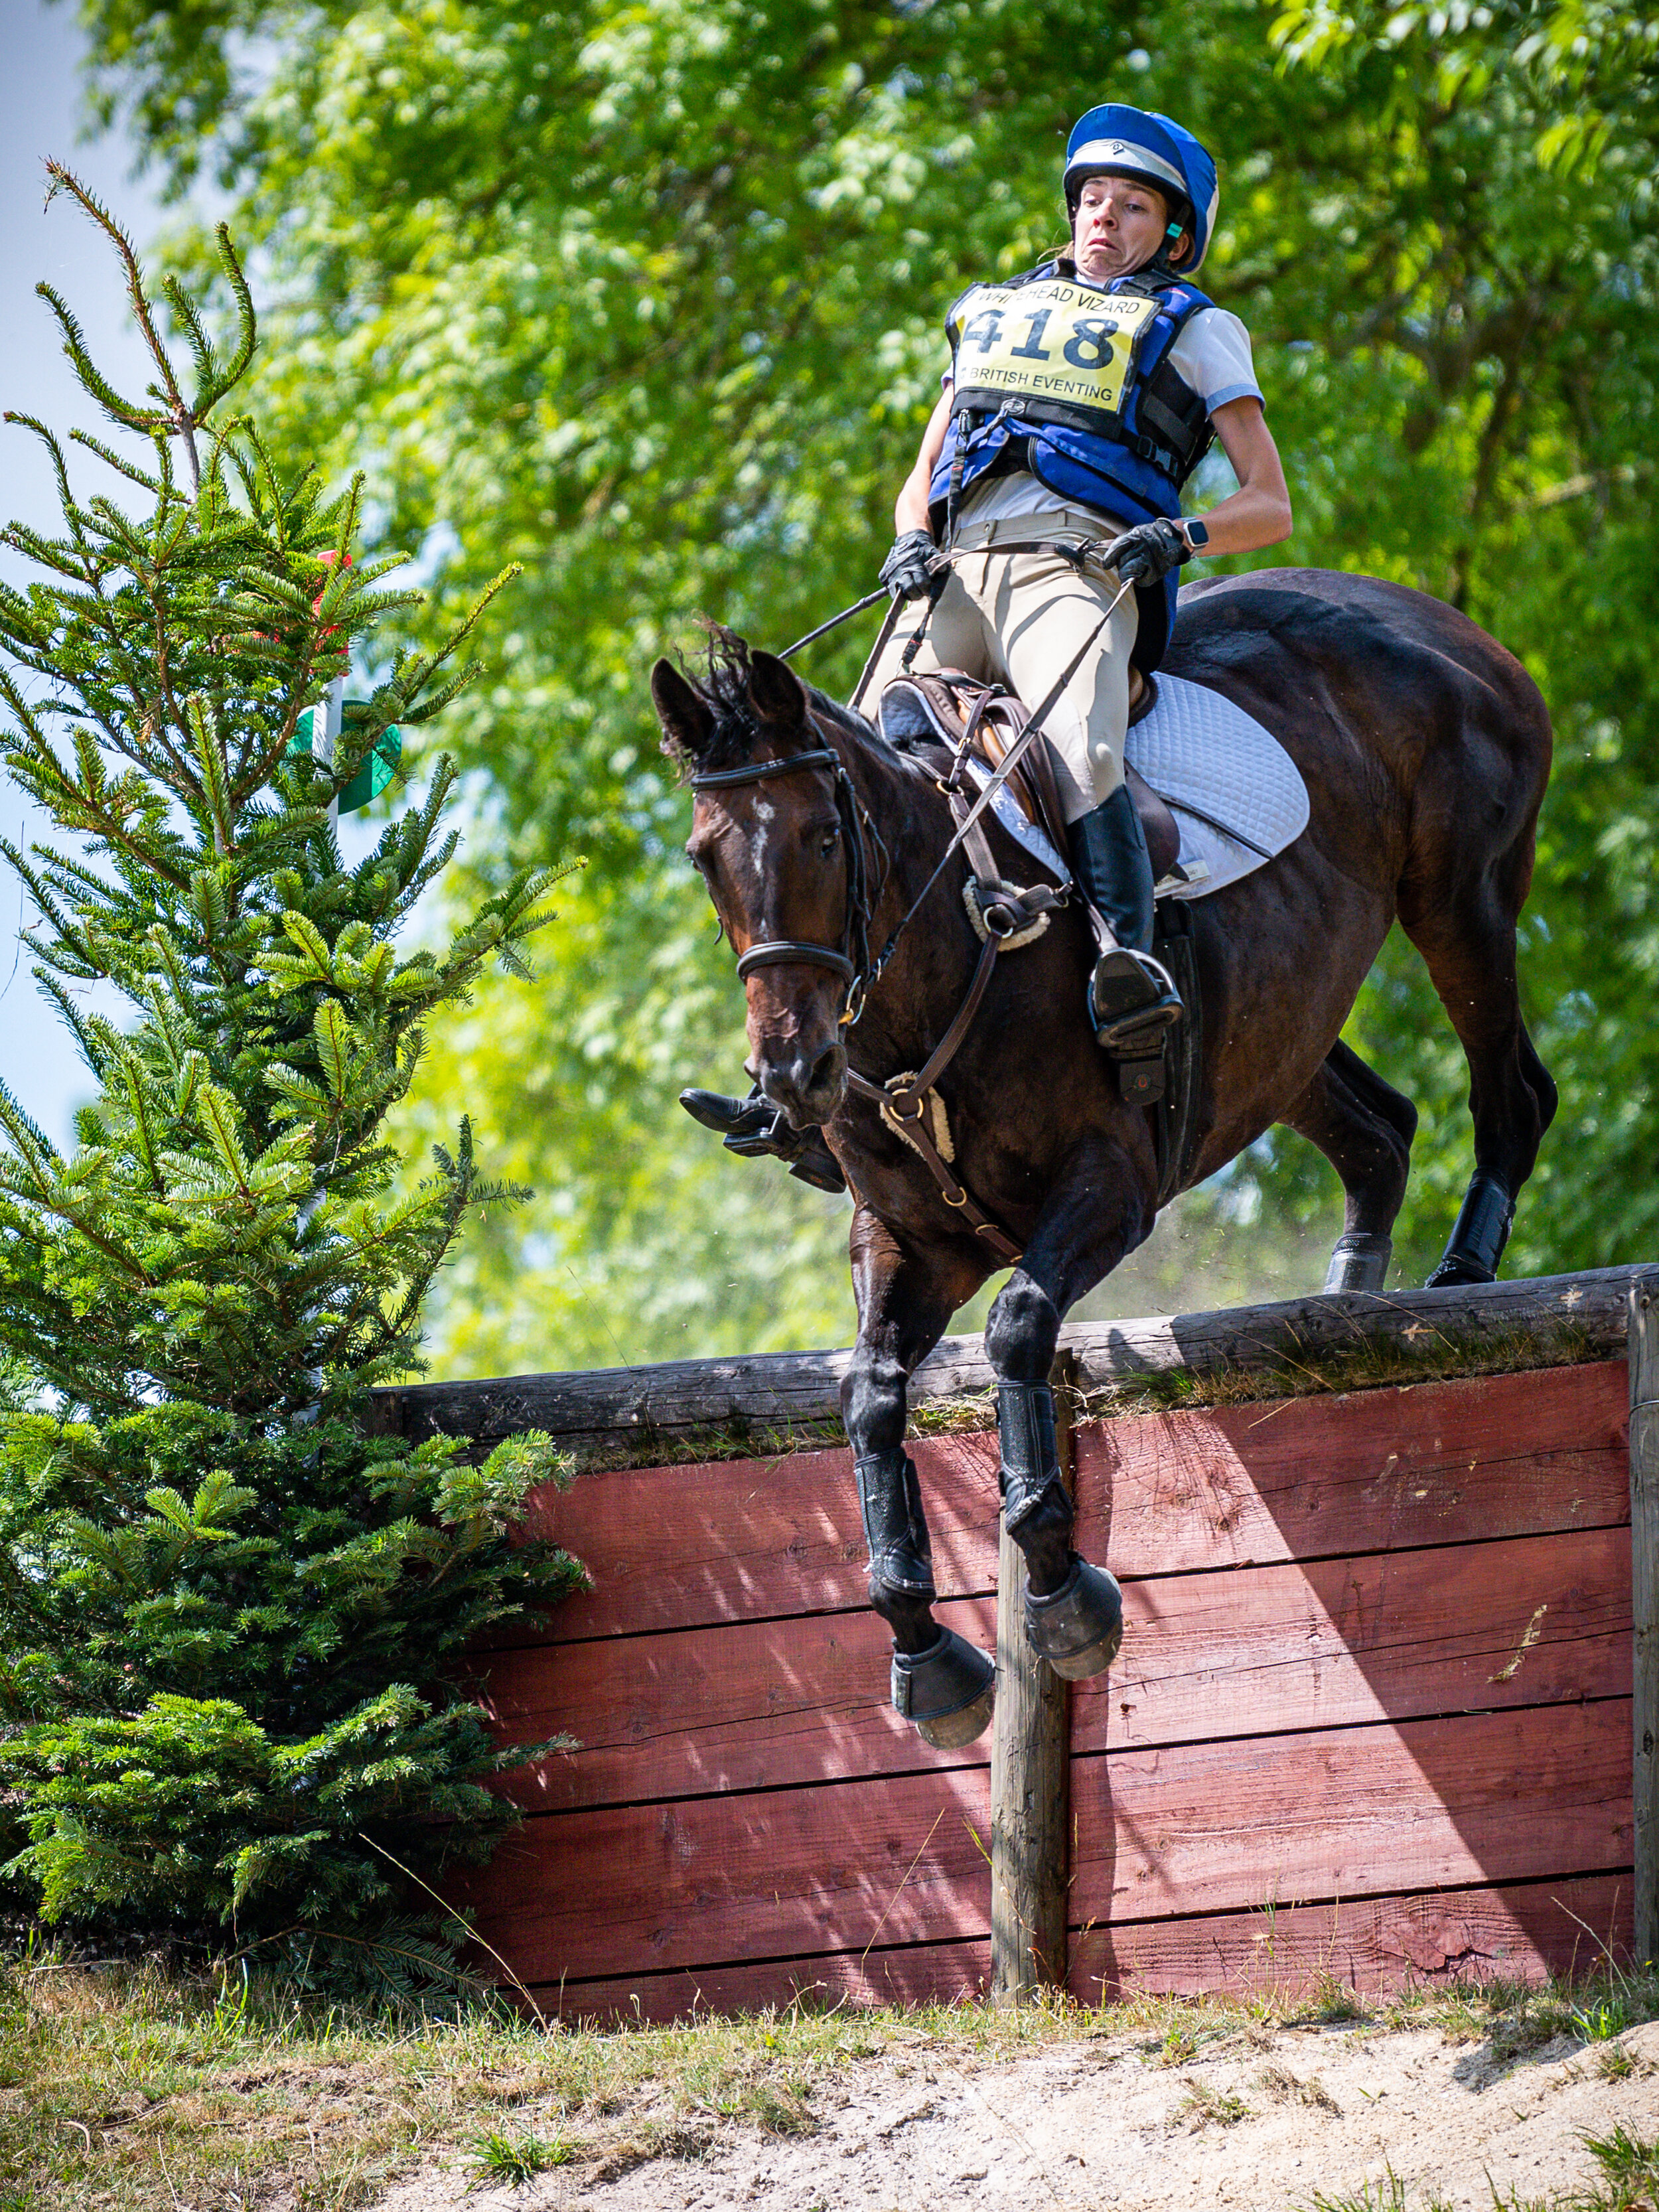
(Nikon D500; 70-200mm at 200mm; f/2.8; 1/4000th sec; ISO 400)
I always remember the water jump at Badminton being a great favourite with both the crowd and photographers. The equivalent jump at Wilton may have been modest in comparison, but there were still opportunities to get some great shots, including a ‘reflection image’ and the spray as the rider and horse emerged from the water – see below. It was unfortunate that the fence was in shadow when I was there, and it may have been sensible to have seen if it would have been in brighter light at other times of the day.

(Nikon D500; 70-200mm at 70mm; f/3.2; 1/5000th sec; ISO 1400)

(Nikon D500; 70-200mm at 70mm; f/2.8; 1/8000th sec; ISO 900)
It is always worth trying something a bit different to make your photography stand out from the crowd. During the cross country I had a go at ‘panning’ as the horse and rider moved from fence to fence. I discuss this technique in more detail in my blogs on How to Photograph Motorsports and How to Photograph Speedway, but it involves using a show shutter speed and moving the camera with the subject in order to blur the background (note how different the camera settings are). I am not convinced that this is wholly successful, but it was certainly worth trying.

(Nikon D500; 70-200mm at 112mm; f/13; 1/80th sec; ISO 160)
I also had a go at just picking out a detail, as in the image below where a horse is crossing a track with all 4 hooves off the ground, throwing up dirt and dust. Taken into the sun, the light helps to focus the eye on the dust, while making the horse secondary as it is in the shadows. Again, it’s an experiment, so it’s a matter of taste whether this sort of photograph works for you or not.

(Nikon D500; 70-200mm at 200mm; f/3.2; 1/5000th sec; ISO 140)
All in all, I had 2 great days at the Wilton Horse Trials – plenty of variety, a fabulous location and exciting photography. Sadly, it has been announced that there will be no further Horse Trials at Wilton, which is a huge shame – but it was fun while it lasted.
If you have enjoyed this blog or if you have any comments, please leave a message in the comments box below. If you have any questions for me, please email me direct at berkeley.m@yahoo.com.